
How to use Shrimpy [Full Guide]

Welcome to Shrimpy!
We presume you clicked on this full guide because you want to learn everything there is to know about Shrimpy.
This full guide will do just that - teach you everything about Shrimpy.
Now, when we say everything, we mean everything. This guide is long. Really long. If you only want information about a specific button or feature, I would encourage you to use the Shrimpy Help Center.
We also encourage customers to ask questions in our Subreddit. It’s a great place to relax, discuss cryptocurrency, and learn about Shrimpy.
Before we begin, don’t forget to hydrate and take frequent breaks. You are about to be thrown into the belly of the beast. If you would prefer to watch the video tutorial of Shrimpy. Check out our video guide below.
How to use the Shrimpy trading bot [Full Tutorial] - YouTube
Here we go!
Dashboard

The purpose of the dashboard is to provide an overview of all assets held within an exchange account or wallet. Each exchange and wallet that is connected to Shrimpy gets a separate dashboard that can be used to monitor the value of the portfolio over time. This means that each dashboard will only show information about a single exchange account or wallet.
Graph Timeframe

You are able to change the time frame displayed on the graph by using the dropdown menu located in the upper right corner of the graph. It is worth noting that the default “Day” view is a rolling 24 hour window. By selecting “Custom” within the dropdown menu, you’re able to create a custom date range to show on the graph.
Select a Data Point

When you move your cursor over the graph (or tap on the graph for mobile), you will see a popup that displays more information about the data point your cursor is hovering over. By clicking on the graph, you can enable the option to “Show Data” which will update your portfolio value, performance, and asset list to display these values for the selected data point. You can revert to your live dashboard by selecting “Clear” shown in the screenshot below.

Multiple Portfolios
Multi-portfolio is a feature in Shrimpy that allows you to manage multiple portfolios for a single exchange account. That means if you currently only have 1 Binance exchange account linked, you can break that one exchange account into multiple portfolios and manage each one separately as if it were a separate account.

Each portfolio can be managed by selecting the “Manage Portfolios” button at the top of your dashboard. This is the place where portfolios are created and funds can be transferred between portfolios.
LEARN MORE ABOUT MULTI-PORTFOLIOS
Default Portfolio
A default portfolio is the portfolio that tracks the changes made outside of Shrimpy. Whenever a change is detected, the default portfolio is the first portfolio that will be affected.
For example, if a deposit was made to an exchange account, the new funds will show up in the default portfolio. When funds are removed from an exchange account, they will first be removed from the default portfolio.
Transfer Funds
Transferring funds allows you to move funds from one portfolio to another. Funds that have been transferred will then be managed by the destination portfolio’s automation. If the destination portfolio is not automated, the transferred funds will instead be protected from trading.
Automation Panel
On the right side of the dashboard, you will find a panel labeled “Automation”. This panel will display which automation is enabled on the selected portfolio, as well as provide access to a few actions that can be taken. These actions are immediate manual actions rather than being scheduled or triggered in an automated fashion.

Rebalance Now
At any time, you can execute a rebalance by selecting the “Rebalance Now” option in the Automation Panel. Selecting this option will take you through the process of executing an immediate rebalance.
When using the “Rebalance Now” option, Shrimpy will execute trades to align your current allocations with the target allocations defined in the automation that is currently active for the selected portfolio. If there is no automation active, then the “Rebalance Now” button will be gray and unavailable.
Portfolio Stop-Loss

A manual, portfolio level stop-loss can be initiated from the Automation panel. A manual stop-loss can be initiated at any time, regardless of whether or not the selected portfolio has an automation assigned to it.
As soon as a stop-loss is executed, any automation assigned to the selected portfolio will be detached from the portfolio. This means you will need to manually re-activate the automation when you are ready to resume rebalancing.
To learn more about Stop-Losses, you can read the following article.
Asset Detail Page

The asset detail page is used to access a variety of different information and features. This page is opened when you select an asset on either the dashboard, trading page, or use the search asset bar found in the top right corner of your dashboard.
Portfolio Selector
Most of the information displayed on the asset detail page is portfolio agnostic, meaning we display an aggregate total of all portfolios on the selected exchange account. The exception that makes this a rule would be manual trades. When trading manually, you must select the portfolio that holds the funds you wish to trade before you’re able to make any selections within the manual trade window.
Your Position
This section shows the current value and amount of the asset that is held in your exchange account. Notice that this section aggregates across all of your portfolios for each individual exchange account. That means if you have multiple portfolios on an exchange, this will sum the numbers for the specific asset across each portfolio.
For example, if you had Bitcoin in 2 different portfolios, the “Value” would be the value of Bitcoin held in both portfolios combined.
Position Over Time
The position over time graph shows the amount of the asset that was held over time. Similar to the “Your Position” section, this graph accumulates across all of your portfolios.
This graph can be used to track how much of an asset you have held over time.
Trade History
This section shows the history of trades completed for the selected asset. This section will only show history for trades placed manually through Shrimpy. Trades placed during rebalancing and trades placed outside of Shrimpy will not populate within this window.
Trade
This section is where you would place a manual trade. As mentioned above, before trading manually you must first select the portfolio holding the funds you wish to trade.
Additional Stats
A wealth of information about the selected asset can be found within the additional stats window. The following information is displayed:
Price Change
The asset stats are the price change of the asset over different time periods. We currently show 1H, 24H, 1D, 1W, and 1M change. It is worth noting that the difference between 24H and 1D is that 24H is a rolling 24 hour window while 1D displays the change in price since the current days open (00:00).
Market Capitalization
Market Capitalization is determined by multiplying the current price of an asset by the circulating supply. This is the metric used to determine cryptocurrency rankings, and indices are based on market capitalization.
24h Trading Volume
This metric displays the total value in all transactions for an asset within a rolling 24 hour window.
Trading Status
Trading Status displays whether or not an asset is currently tradable on an exchange. There are many factors that can negatively impact trading status, such as exchange downtime, asset network maintenance, etc.
Asset Popularity
Asset popularity is defined in Shrimpy as the percentage of user portfolios which hold this asset. This means whether the user portfolio holds 1% of this asset or 100% of this asset, they are both weighted equally when calculating asset popularity.
Asset Dominance
Asset dominance is the average percentage of the asset which is held across all Shrimpy user portfolios. This includes both users who have 0% allocated to this asset as well as those who have 100% allocated to this asset.
Average Entry/Exit prices
These metrics display the average prices in which you have bought and sold an asset. It is worth noting that we are only able to calculate your average entry and exit prices using trades placed through Shrimpy, we are not able to include trades placed externally.
Cold Storage
Shrimpy supports cold storage balances on the asset detail page. A cold storage balance represents assets held off exchange, and Shrimpy will consider cold storage balances during rebalance calculations.
Let’s say, for example, you want to hold 50% of your crypto holdings in BTC and you want to keep most of that off exchange. Depending on the balance of your portfolio, you could keep potentially 90% of your BTC off exchange and leave 10% of it available for trading. Shrimpy would act as if you had all of your BTC on the exchange and trade accordingly to maintain your target allocations even without access to all of your funds.Please keep in mind, we cannot trade balances represented by cold storage, Shrimpy can only trade funds that are held on-exchange for rebalancing purposes.
In Shrimpy, the balance bar graphs are light blue for “Cold Storage” amounts and dark blue for assets held on the exchange.
Automation Page
The automation page is where a lot of the magic happens. This is where you will configure your automated strategy. The strategy that you attach to a portfolio will then begin automating the selected portfolio.

Notice that until you specifically select “Start Automation” and then select a portfolio on the following popup window, Shrimpy will not make trades for your portfolio.
At any time, you can also stop an automation by clicking “Stop Automation”. This will remove the automation from a portfolio. At that point, Shrimpy will stop trading for that portfolio until you manually assign another automation to it.
There is a 1:1 relationship between automations and portfolios. This means that an automation can only be assigned to a single portfolio, and a portfolio can only have one automation assigned to it at any time.
Creating an Automation

The first time you visit the Automation page, you’ll be prompted to select which type of automation you wish to create. The options available to you are “Pick Assets” and “Create Index”. If you already have an automation saved, you will skip this prompt and you’ll see a page that looks like the screenshot above. To create a new automation once you have saved your first, simply click on the “+” icon found in the top right corner of the automation page.
BYO (Build Your Own)
Adding a custom portfolio of assets is possible by clicking the “Pick Assets” button when asked which type of automation you wish to create. You will see the following page:

Once you click the “Pick Asset” button, you will be able to browse the different currencies available on the linked exchange, select which ones you would like in your portfolio, and then pick the percentages you want allocated to each.
Generally, this is the easiest way to start using Shrimpy. Picking a custom selection of assets is quick, easy, and will produce the results you expect.
Select Allocation Percentages
Selecting your own allocation percentages is only available when using the “Select Assets” button. If you selected the “Create Index” button, the allocations for each asset will be defined by the configuration of your index.
After you have added your desired assets to your automation, you will see that each asset has a slider. This slider defines how much of the asset you will allocate in the portfolio when you activate the automation.
For example, if you select 30% Bitcoin for your automation, that means when you activate this automation for a portfolio and rebalance, Shrimpy will buy and sell your assets such that 30% of your funds will be in Bitcoin.
Your allocation percentages for any automation must sum to exactly 100%. In addition, all assets in your allocations must be allocated more than 0% of your portfolio. If you no longer want an asset in your allocations, click the trash can icon to remove it from the portfolio.
LEARN MORE ABOUT CREATING AUTOMATIONS
Create Index (Dynamic Allocations)
The “Create Index” button is a bit more complex than the “Add Assets” button. Creating an index requires more knowledge about how dynamic indexes work with Shrimpy.
There are a number of ways to implement your cryptocurrency indexing strategy. Each aspect of your index can be configured on Shrimpy. The process of configuring an index is explained in great detail in this article.
Weight by Market Cap
Weighting an index by market cap is the most common strategy people take when allocating funds. Using a market cap weighting means the index is as close as possible to tracking the actual value held in the market being tracked - in this case, cryptocurrency.
Weight by Square Root Market Cap
An index fund can also be weighted using the square root of the market cap. Often, this method is used when there are some assets which massively shift the weighting of the index when using a market cap weighting. These are typically assets with significantly higher market caps than any other asset in the index. An example of an asset that currently fits this description is Bitcoin. At the time of writing, Bitcoin holds nearly 70% of all value in the market, making it the largest contributor to global cryptocurrency market cap by a significant margin.
Weight Equally
The most simple allocation weighting strategy for a fund is to evenly weight each asset in the portfolio. Each asset having the exact same value of funds allocated. While this strategy is far less common than market cap weighted strategies, some recent research has found evenly allocated indexes have tended to outperform market cap weighted indexes historically. This suggests evenly allocated index funds are worth the attention when considering which strategy is best for your personalized index fund.
Asset Range
Before getting into the technical details of the index fund, the first thing we need to do is decide on the assets which should be in the index. This is fundamentally what matters more than anything else we will do with our index.
In general, the most common way to select assets for a cryptocurrency index is to prioritize those with the highest market cap. That means calculating the cryptocurrencies with the highest market cap and selecting the top 10, 20, or 30.
Min Allocation Percentage
The cryptocurrency market is still dominated by a few major players. The top two assets alone comprise of 75% of the market cap. The tenth asset only holds .5% of the market cap. This vast disparity can lead to a lack of diversification in an index fund when allocating by market cap. When using a square root market cap or evenly allocated index fund, one option available is to implement a minimum weight for the index - that way every asset can provide a healthy contribution to the index.
Max Allocation Percentage
Similar to the discussion in the above section about minimum weighted allocations, there are also times when you want to provide a cap on the maximum amount a single asset can be allocated. This is ideal for asset classes like cryptocurrency where a single asset like Bitcoin can consume as much as 70% of the market cap. Under these conditions, it may be ideal to provide a maximum percent which can be allocated to a single asset.
Buffer Zone
This defines a threshold at which point an incoming asset should be considered for addition into the index. A common example is the use of a 5% ‘buffer zone’. When a new asset increases in market cap to become 5% higher than another asset in the index, the new asset is then added to the index, removing the asset which was beat out.
Asset Types
Many investors choose to invest in a specific asset type, investment sector or blockchain. By using asset tags, you can prioritize a specific feature of an asset when determining which assets to include in your index and any asset that does not share the selected tag will be automatically excluded from your index.
Include List
There are times when you might want to include specific assets in an index, even if they don’t abide by the index asset selection methodology. While this wouldn’t be possible when using services like Bitwise or Crypto20, creating your own index provides you the flexibility to adjust your index to include assets which don’t abide by a strict selection criteria.
Exclude List
Similar to ‘inclusions’, there are times when you may want to exclude an asset from an index, even when the asset strictly meets the criteria to be included in the index. Constructing a personalized index allows you to make these decisions without impacting your entire indexing strategy.
LEARN MORE ABOUT CREATING AN INDEX
Rebalance Strategy
Rebalance Strategy refers to the parameters by which your portfolio will initiate trades. These can be in the form of Periodic, Threshold, or Manual rebalancing.
Periodic Rebalancing
The simplest of these strategies is periodic rebalancing, which uses a fixed amount of time between each rebalance. This amount of time is usually shorter for cryptocurrencies than for other asset classes, due to rapid price fluctuations. For example, it would be reasonable to select a portfolio rebalance time of 1 day. This would mean that at the same time every day, your portfolio would be rebalanced.
Threshold Rebalancing
Threshold based rebalancing is a portfolio management strategy used to maintain a set of desired allocations, without allowing the asset weightings from deviating excessively. When one of the individual constituents of the portfolio crosses outside the bounds of their desired allocations, the entire portfolio is rebalanced to realign with the target allocations. To say this another way, when any one asset included in your automation exceeds the threshold you set, a rebalance of your entire portfolio will occur.
The bounds around each allocation are the “threshold”. Set by the user, the threshold prevents excessive deviation from the target allocations.
Read our study that compares the performance of periodic and threshold rebalancing.
Manual Rebalancing
By choosing periodic rebalancing and selecting a time period of “Never”, you can set your portfolio up so that your automation will not trigger any trades without manual input. When you do choose to rebalance manually via the dashboard, Shrimpy will make trades to get from your current balances to your target allocations.
More Rebalance Settings
There are a number of settings hidden within the “Show More Rebalance Setting” hyperlink that will allow you to further customize your automation.
Dollar Cost Averaging
Dollar-cost averaging (DCA) is a strategy used by investors to reduce downside risk of placing large sums of money into the market at one time.
While traditionally this refers to purchasing a single asset on a regular interval, we will be focusing on the feature from the portfolio perspective by considering it as a way to regularly inject new funds into a portfolio.
A DCA rebalance will trade only the deposited funds and those funds will be distributed to assets that are below your target allocations at the time of deposit.
Portfolio Stop-Loss
Although stop losses are often used by traders to manage a strategy across a single market pair, the remainder of the discussion will center around the idea of a portfolio stop loss. When we say “portfolio stop loss”, we are referring to the entire portfolio of assets currently held by the investor.
Rather than being concerned with each individual asset, portfolio stop losses pull the entire portfolio out of the market when a stop loss is triggered.
The funds that were held in the portfolio will all be converted to a stable currency (assets like USDT or USDC). Completely pulling the portfolio out of the market reduces the risk of a portfolio continuing to drop as the market declines.
It is worth noting that if you are using our Multi-Portfolios feature, a stop loss will only affect a single portfolio. Multiple portfolios will require multiple stop-losses.
Threshold Percentage
The threshold is the percent at which the stop loss is triggered. This threshold is applied over the time period that is specified in the previous box. A threshold of -5% with a time period of one day would mean the stop loss will trigger when the value of the portfolio decreases by 5% in one day.
You are able to set both positive and negative thresholds, using a positive threshold will act as a take profit and will exit positions after your portfolio value has increased beyond your set threshold. Using a negative threshold will act as a traditional stop loss and will exit positions after your portfolio has decreased beyond your set threshold.
Time Period
The time period defines the length of time that is evaluated for the stop loss. A time period of one day would mean Shrimpy will evaluate the last one day of portfolio performance to determine if the stop loss should trigger.
It is worth noting here that this is a rolling time window, and the stop loss is always evaluating the entire duration of the time period selected. This means that if you select 24 hours, as soon as you start the automation Shrimpy will evaluate the previous 24 hours of performance and if your performance exceeds your threshold, it will trigger immediately. It is recommended to remove or loosen a stop loss after it is triggered until the duration of the selected time period has passed.
Currency
The currency is the asset that will be purchased when the stop loss is triggered. Every asset in the portfolio will be sold to buy this asset during a stop loss. The selection of currencies is limited to only stablecoins, fiat currencies, and BTC.
Fee Optimization with Maker Trades
A maker order is similar to a taker order except instead of being placed at the current best bid or ask price across the spread, it is placed as an open limit order (or “maker”).
Maker Order - A sell order placed above the current best buy order, or a buy order placed below the current best sell order. In either case, the order is left open on the exchange for another person to take. Maker orders incur maker fees.
It should be noted that a rebalance with Fee Optimization enabled can take up to an hour to complete. The reason for this is because you are waiting on other traders to take your orders placed on the exchange which can take time. After a set period of time, an unfilled maker trade will be canceled and replaced with a taker trade in order to complete the rebalance.
LEARN MORE ABOUT FEE OPTIMIZATION
Max Spread Percentage
Inputting a value for the maximum spread percent control will mean Shrimpy will not execute a trade over a spread that is larger than that amount. So, if you set a spread of 10% for example, Shrimpy will not cross a spread that is more than 10%.
Max Slippage Percentage
When being a "taker", you are executing the order immediately and removing that order from the order book. If your order was large enough to consume the entire order at that price, that means the next available price will be worse than the previously purchased price. This movement is called slippage. As we continue to consume the order book and move the price further away from the original purchase price, the Shrimpy application tracks this as slippage.
So, if we have a max slippage percentage of 5% set, that means the Shrimpy application will only allow the price to drift 5% before we cease execution. The slippage is calculated from the first executed trade to the current trade that is being evaluated. That way we always know the original price at which we executed our first order and can compare that to the next price we will attempt to place an order.
Trading Page
The Trading page is a resource for you to discover new assets and shows performance over multiple time frames as well as the market cap and 24h volume of an asset. This information can help you decide whether or not you want to include an asset in your portfolio.

Clicking on an asset will take you to the relevant Asset Detail page. As referenced above, this is where you will place trades manually. Because the rest of the Asset Detail page was covered above, this section will focus exclusively on how to place manual trades.

Your Position
This area displays stats about your current holdings for the selected asset. It is worth noting that you cannot trade more of an asset than you hold within the selected portfolio.
Trading Panel
This is where you can use our Simple Trading interface. All trades placed manually are limit orders and while you cannot set the price yourself, the trades placed are top-of-book by default. This essentially gives you a market order trading experience with all of the benefits of a limit order.
Placing Trades
Placing trades using our Simple Trading interface is extremely simple, just select an asset you want to sell, input how much you’d like to sell, and select the asset you want to purchase. We’ll take care of the behind-the-scenes math and give you an estimate of how much of the purchased asset you will receive. If you’re satisfied with the trade, proceed to the Trade Preview.
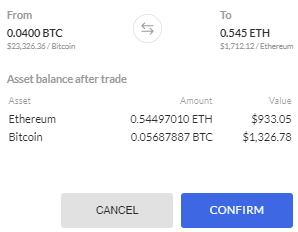
In the Trade Preview, you have another opportunity to verify all of the information about the trade you are submitting. You can see which assets are being traded and how much, along with the total USD value of the assets in question. Further down you can see what your balances in both assets will be after the trade is completed. Once again, if you’re satisfied, confirm the trade. You will see a notification at the bottom of the page notifying you that the trade was placed successfully.
History Page

The history page is where we can view everything that Shrimpy has done for our account. We can see things like rebalances, when we start and stop following a leader, and much more.
The goal for this tab is to track everything that ever happens with your Shrimpy account.
Rebalance Trades
The trades that are executed during a rebalance will show up in your history. Trades will be grouped by asset when they are displayed. For example, Shrimpy might make 10 trades for Bitcoin, but they will be aggregated and shown under a single Bitcoin button. The value and price numbers use a weighted average to arrive at those results.
You can click the asset to see the individual trades that were executed for the asset.
Automation Updates
Whenever you update an automation that is currently attached to a portfolio, you will see that automation update in your history. The history item will include information about your strategy selection and rebalance period.
Currency Filter
On the history tab, you can filter by an asset by typing in an assets name or symbol into the search box. For example, if you type in BTC, Shrimpy will filter for trades that happened with BTC.
Trade Breakdown
The breakdown of individual trades that were executed can be found by clicking on a single asset in a rebalance history item. Once selected, you will see a popup with all of the individual trades that were executed for that asset during the rebalance.
Backtest

Backtesting allows customers the ability to evaluate how a strategy would have performed historically. That way it’s possible to get a general expectation for what might be possible with a specific strategy.
Asset Selection
The assets that should be included in the backtest can be selected under the section that is titled “Select Assets”. This will add each selected asset to the right side where allocations can be specified.
Each asset that is selected must be allocated more than 0% allocation. The allocations must add up to exactly 100% before the backtest can be run.
Backtest Configuration
On the left side you can see a section titled “Backtest Settings”. In this section, we can configure our rebalance strategy and trading fee. Notice that only one rebalancing strategy can be evaluated at a time.
Trading Fee
The trading fee setting is used to calculate how much should be taken in fees for each trade that is executed during the backtest.
Rebalance Period
The rebalance period indicates how frequently a rebalance should be executed to re-align the portfolio to the target allocations. The frequency can range from every 1 hour to over a year.
Rebalance Threshold
The rebalance threshold can be used to specify at what threshold the portfolio should be rebalanced to re-align the assets to their target allocations. The threshold is based on the deviation each asset has from their target allocations. To learn more about threshold rebalancing, see the above section on “Threshold Rebalancing”.
Fee Optimization
Enabling fee optimization will allow you to simulate how Shrimpy would perform with or without “Fee Optimization” enabled. You can learn more about fee optimization in the section above about “Fee Optimization with Maker Trades.”
Backtest Results
Once you select “Run” for the backtest, you will start to see the results of the backtest. This will include the population of the main graph along with other stats that can be used to indicate how well rebalancing performed compared to holding the same assets.
Shrimpy Final
“Shrimpy Final” refers to the amount of funds you would have had at the end of the backtesting period if you rebalanced using the portfolio allocations and rebalancing settings defined in the backtest.
Holding Final
“Holding Final” is the amount of funds you would have had at the end of the backtesting period if you didn’t execute any rebalances during the period. Instead, if you had held the same assets in a portfolio that didn’t rebalance.
Difference
Difference is the amount better or worse that Shrimpy Final performed compared to Holding Final.
Copy Portfolio
Clicking on the “Copy Portfolio” button will copy the portfolio you have been backtesting into your “Automation” tab.
Settings

Settings are the options that will be applied across all of your exchange accounts. Anything that is important for your Shrimpy account is put into the “Settings” tab. This includes options for Multi-Factor Authentication, linking exchange accounts, and your subscription.
General Settings
The general settings tab is a miscellaneous assortment of options that are available to Shrimpy users.
Shrimpy supports an easy way to change your email at any time. To start the process, begin by navigating to the "Settings" tab and locating the section marked as "General Settings". Under this heading, you will find the input box for "Email".
LEARN MORE ABOUT CHANGING EMAIL
Display Currency
Shrimpy supports a handful of currencies for display purposes. When switching between these display currencies, your balances, prices, and other data will be converted to show in terms of your selected display currency.
LEARN MORE ABOUT DISPLAY CURRENCY
Security
Security is always the top priority for the Shrimpy team. That means we are constantly being proactive in providing the latest and greatest security features.
IP Whitelist
IP Whitelisting is a feature which exchanges use to restrict access to your cryptocurrency exchange account. Setting up IP Whitelists means the exchange will only accept requests when they are sent from the specific IPs that are input into the exchange. This prevents unauthorized access to your exchange account from any other IP.
LEARN MORE ABOUT IP WHITELISTING
Multi-Factor Authentication
Two-Step Authentication (AKA Multi-Factor Authentication) provides a way that even if a password is stolen, the user's phone or secret key is still required to log into their Shrimpy account. We highly recommend everyone enable 2FA.
API
The Portfolio Management APIs allow customers to manage their Shrimpy account through APIs. These simple APIs provide ways for customers to automate custom strategies, adjust allocations with scripts, and easily interface with their portfolio.
API Documentation can be found here.
Accounts
Connecting to exchanges and wallets is the core feature that is offered by Shrimpy. We provide one of the easiest exchange and wallet linking experiences in the market.
Link Exchange/Wallet
In order to begin trading on Shrimpy, you will need to connect your exchange APIs to the Shrimpy application. This is done through the "Exchanges" tab in "Settings". You can see a drop down with each of the exchanges we support along with text boxes to input the relevant information about your API keys.
LEARN MORE ABOUT LINKING EXCHANGE ACCOUNTS
LEARN MORE ABOUT LINKING WALLETS
Rename Exchange/Wallet Account
In Shrimpy, it's possible to provide a custom name for your exchange accounts. That way you can differentiate between exchange accounts when you have a number of different accounts linked for the same exchange. This is done simply by going to "Settings", "Exchange", then selecting the exchange you would like to rename. At the top, you will see an edit icon that can be used to rename the exchange account.
LEARN MORE ABOUT RENAMING ACCOUNTS
Referral Link

Shrimpy pays customers for referring new users to Shrimpy. By sharing your custom referral link that is found inside your "Earnings" tab, Shrimpy can track when a new customer signs up and pays using your referral link.
LEARN MORE ABOUT REFERRAL LINKS
Make A Payment

Before you can begin using the trading features in Shrimpy or follow a leader, you must first connect a payment method and select a subscription plan. If you select to use PayPal or credit card payments, Shrimpy will automatically renew your subscription each month until you cancel your subscription.
Cryptocurrency payment must be manually made by visiting the “Billing” tab on the “Settings” page.
Your Commissions
Once you start referring new users and have gathered a following in the social program, you will want to get paid. In Shrimpy, the payment process is easy. Navigate to “Settings”, then click on “Earnings”. This will show you how much money you have earned in Shrimpy so far.
Link PayPal
Commissions are paid to leaders and people who refer customers through PayPal. Once a PayPal account has been linked to Shrimpy, leaders and affiliates can begin getting paid.
Navigation Bar
The navigation bar provides quick access to a few key actions that can be taken in the Shrimpy application.
Chat

After following a Leader, you will join a Leaders chat thread. This is an area within Shrimpy where you can communicate with the Leader you’ve chosen to follow. For Leaders who prefer to use other methods to communicate with their followers, we provide the option of linking to your community directly from your Leader Profile.
Notifications

Notifications provide a way for Shrimpy to update you on specific events that might require your attention. These events can be anything from social notifications to announcements from the development team. Generally, notifications can be clicked to automatically navigate you to relevant areas of the application.
Notice that these notifications are specific to each individual exchange account.
Rebalance Status

Rebalancing is one of the most important events that can happen on Shrimpy. As a result, we provide an easy indicator to let you know when Shrimpy is completing a rebalance. If the icon turns orange, that means a rebalance is in progress. When using “Fee Optimization with Maker Trades”, you will also see the rebalance progress bar and the ability to cancel the rebalance in this drop-down.
Subscription Status
The credit card icon will display the current status of your subscription. If your subscription payment is due, you will find the icon will change color and warn you that a payment is due.
Accounts Menu

On the furthest to the right, we can find the accounts menu. This menu is used to switch between the different exchange accounts and wallets you have linked to Shrimpy.
Remember, each exchange account and wallet is completely separate in Shrimpy. That means if you link multiple exchange accounts, you must set up automations for each exchange account.
Each exchange account and wallet will also have its own dashboard, trading tab, backtesting page, and more. Everything is specific to the account that is selected.
LEARN MORE ABOUT MANAGING MULTIPLE ACCOUNTS
Contacting the Shrimpy Team
The Shrimpy team is always ready to help any way we can. If you have any questions at all, the quickest way to reach our team is through the Support button. This button is available to all customers and it is located at the bottom of the sidebar.
Use the support button to ask us any questions, give feedback on what you like or ways we can improve, or request new features.You can also reach us by email, our Support address is: Support@Shrimpy.io
Links to our other social channels include:
We’re looking forward to having you on Shrimpy and building the best cryptocurrency trading community possible!